Sunday, 13 March 2016

How to kill a process in SystemVerilog


In this blog, we will see a couple of issues in the simulation while using "disable fork" and "disable LABEL" statements. Most of us, have faced these kind of issues at least one time in our system verilog programming and I just want to sum up them on a single page.


(1) Issue while using "disable fork;" statement in the code

Below is the pseudo code to understand:

task multiple_process();
    fork
        forever begin
            #10; // Task-A
            $display("Process-1");
        end
    join_none
    fork
    begin
        dly1=$urandom_range(1,10);
        #dly1; // Task-B
        $display("Process-2");
    end
    begin
        dly1=$urandom_range(1,20);
        #dly1; / Task-C
        $display("Process-3");
    end
    join_any
    disable fork;
    $display("Process-4");
endtask : multiple_process

As shown in above task, "Task-A" process is running continuously. Two different processes, "Task-B" and "Task-C" should run in parallel and any of two processes is completed, other process shall stop its execution due to join_any statement.

While simulating above code, you may face that when the disable fork is executed, "Task-A" process also stop it's execution. So, to avoid this kind of situation, it's better to use "disable LABEL" statement.

(2) Issue while using "disable LABEL" statement:

task multiple_process();
    fork
        forever begin
            #10; // Task-A
            $display("Process-1");
        end
    join_none

    fork : LABEL_B_C

    begin
        dly1=$urandom_range(1,10);
        #dly1; // Task-B
        $display("Process-2");
    end
    begin
        dly1=$urandom_range(1,20);
        #dly1; / Task-C
        $display("Process-3");
    end
    join_any
    disable LABEL_B_C;
    $display("Process-4");
endtask : multiple_process


Above code works fine with a single instance of that class. It disables only "Task-B" and/or "Task-C" process when "disable LABEL_B_C" is executed. But when there are multiple instances of the same class in the testbench and all the instances are executing their threads simultaneously then the simulation will stop after executing "disable LABEL_B_C" statement of any instance.


To handle these kind of situations, it's better to use "process" class in the system verilog to kill any process.

task multiple_process();
    process b_process, c_process;

    fork

        forever begin
            #10; // Task-A
            $display("Process-1");
        end
    join_none

    fork : LABEL_B_C

    begin 
        b_process = process::self();
        dly1=$urandom_range(1,10);
        #dly1; // Task-B
        $display("Process-2");
    end
    begin
        c_process = process::self();
        dly1=$urandom_range(1,20);
        #dly1; / Task-C
        $display("Process-3");
    end
    join_any
    if(b_process.status != process::FINISHED)
        b_process.kill();
    if(c_process.status != process::FINISHED)
        c_process.kill();

    $display(“Process-4”);
endtask : multiple_process

Here, we are defining each process using process class and after join_any, we are checking that whether any of “b_process” or “c_process” is finished or not.If it is  not finished, then kill that process.

Reference:
(1) IEEE Standard for SystemVerilog (IEEE Std 1800™-2012)
(2) https://verificationacademy.com/forums/systemverilog/fork-within-loop-join-all

Wednesday, 3 February 2016

Synchronization using UVM features


Note: This blog is useful when the verification environment is developed using system verilog and UVM methodology. 

In this blog, we go through the synchronization feature of UVM. For it, UVM contains “uvm_barrier” and “uvm_event” classes. These classes contain different in-built methods which are very useful for setting/resetting events or waiting to complete any particular event.

An example here will be helpful in understanding the concept to achieve synchronization of different tasks in same component or different components through uvm_barrier and uvm_event.


As shown in the figure 1, there are 3 different tasks (task_a, task_b and task_c) are running parallel and they are independent from each other. Here, you can assume that, there are 3 different components running in parallel. Now, the requirement is like any two of three tasks (task_a, task_b and task_c) are completed or any two tasks reach at a particular stage, another task (trigger_event) shall start its execution.

Figure 1

To achieve synchronization between them, a barrier (b) is created which indicates to wait for 3 processes to be completed and same barrier is passed into all different tasks. Also, the same barrier is passed into “trigger_event” task as it has depended on task_a, task_b and task_c tasks.

The example requirement is shown in the flowchart (figure 2).

 
Figure 2

As shown in figure 3, all tasks are doing some execution (indicated by #delay) and then it waits for the tasks to be in sync with other tasks by using barrier task (wait_for). Once any 3 tasks are in sync, the wait_for() condition will be satisfied and it executes next statements.

Figure 3
As shown in figure 4, “trigger_event” task is created which waits for the completion of any two tasks and then it do some execution. Then it triggers an event so that “process_on_event” task can start its execution. After performing some tasks, it resets the event based on which “process_on_event” task can perform other functionality.

Figure 4
You can achieve different functionalities like to reset the barrier, change the threshold value for waiting at the barrier etc. by using "uvm_barrier" class.

By using “uvm_event”, you can achieve functionalities like waiting on starting of the event or ending of an event, reset the event, get and change the number of waiters on the event etc.

Thanks to “Chitra Bhatia (Principal DV Engineer, Applied Micro) and Ali Hussain (Senior Staff Design Engineer, Applied Micro)“ for helping with this blog.

Reference:
  1. Universal Verification Methodology (UVM) 1.2 Class Reference


Wednesday, 23 December 2015

Creating intelligent testcases using uvm_report_catcher

In this blog, we will go through the verification method for erroneous scenarios which helps you to prevent your RTL from error cases and also helps you to find out bugs easily.

This blog is written based on UVM feature for changing severity of message by using “uvm_report_catcher”. For using this feature let’s take an example of verifying any IP. As we know, we are testing normal scenarios as well as we also verify the behavior of IP with the error scenarios to check that error related interrupt is asserted or not or error indicated register is updated or not.

Let's say, a sequence (“proc_crc_err_seq”) is developed to check CRC error condition and we are expecting error for it. Then, a normal sequence “proc_norm_seq” is driven to the IP and in that case we are not expecting any error.

After developing the test, we can run the simulation and check that error is injected properly or not. Also we check that, IP/VIP has reported error properly or not from log file and also from the waveform. But it is not possible for us to go and check waveform and log file every time.

In the regression we check that any test failed or not and we debug failures. Here, in this test we are expecting CRC error. So we can keep the test in the expected failure list. But we need to keep track few things like,
(1) CRC error generation is must.
For example, somebody has updated RTL or testbench and due to that CRC error is not generated. It will create a big issue later on as error scenario is not verified.
(2) There shall not be any error other than “CRC error”.
It is good to track whether RTL or testbench is generating any other error or not for the above condition.
(3) CRC error shall be generated in the first sequence only.
If RTL generates CRC error for a good sequence driven after a bad sequence, then it creates another trouble.

To overcome this problem, we can use “uvm_report_catcher” class. Below is the example, how to demote this error and also demonstrate how to overcome above three problems by implementing proper logic in the testcase.

Example:
class test1_demoter extends uvm_report_catcher;
  bit err_demoted;

  `uvm_object_utils(test1_demoter)

  function new(string name="test1_demoter");
    super.new(name);
  endfunction : new

  function action_e catch();
    if((get_severity() == UVM_ERROR) && 
        (get_message() == "CRC error generated."))begin
      set_severity(UVM_INFO);
      err_demoted = 1;
    end
    return THROW;
  endfunction : catch
endclass : test1_demoter

class crc_error_test extends uvm_test;
  test1_demoter demoter;
  …
  …
  function void build_phase(uvm_phase phase);
    …
    demoter = test1_demoter::type_id::create("demoter");
    …
  endfunction : build_phase

  task main_phase(uvm_phase phase);
    uvm_report_cb::add(env.ag.mon, demoter);
    crc_err_seq.start(env.ag.seqr);
    uvm_report_cb::delete(env.ag.mon, demoter);

    if(demoter.err_demoted == 0)
      `uvm_report_error(get_full_name(),”CRC error is not detected by the test”)

    norm_seq.start(env.ag.seqr);
  endtask : main_phase
  ...
  ...
endclass :crc_error_test

In above example, we assume that, "CRC error generated." error will be generated from the monitor when CRC error is injected and we need to demote it. For it, “test1_demoter” class is used to demote the error. “err_demoted” variable is used for checking whether error is generated or not in the simulation. "catch" function is used to change the severity of the error message. 

In the testcase, test1_demoter is instantiated and registered with the “mon” object handle (env.ag.mon => from where the error message will be generated) before driving the error sequence. After driving the sequence, we delete the callback object from “mon” object handle and checks that error occurs or not in the previous sequence. Then we drive normal sequence.

So in the simulation, when "crc_err_seq" is driven, "CRC error generated." error will be generated but as we demote it, it will be displayed as "UVM_INFO" instead displaying as "UVM_ERROR" and also the error count will not be incremented. If this error is not generated then, "err_demoted" variable will not be set and from testcase, we can detect that CRC error is not generated by RTL or testbench.


If any other will be generated then UVM_ERROR message will be displayed and we can track it.
As we delete the callback, if any error is generated for "norm_seq" then also UVM_ERROR will be generated and we can debug the issue.

So at the end of simulation, we are not expecting any error and our regression shall be clean.

Reference:

(1) Universal Verification Methodology (UVM) 1.1 Class Reference, June 2011

Monday, 14 December 2015

Introduction to encryption in System Verilog with Questa-Sim


In this blog, we will go through the encryption mechanism in verilog and systemverilog using Questa-Sim. The protection expressions `pragma protect” for Verilog/SystemVerilog specify the encryption algorithm used to protect the source code.

For protecting the code, first you need to identify the portion of code which you need to encrypt and then use the “`pragma protect” directive in your code followed by compiling your code with “+protect” argument.

Example:
vlog +protect file.v or vlog +protect file.sv

By executing above code, it creates “file.vp”/”file.svp” in the “work” library which is a protected version of file and protected code will be encrypted. This file can be delivered to the end customer.

Here, you can give the file name during compilation option also.

Example:
vlog file.v +protect=protected_file.vp

After executing above code, it creates “protected_file.vp” which is a protected version of “file.v”. 

If specific pragma keyword is not specified then tool will use its default value.
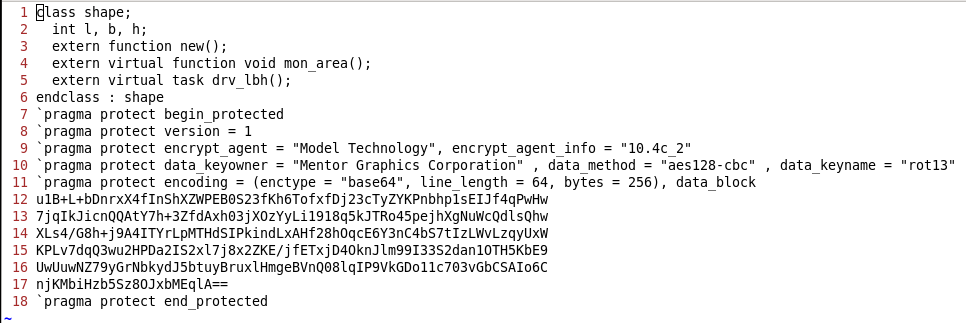
Below are some examples and usages of syntax for encryption:

Figure 1

Figure 2
Here, encryption envelope which is encrypted using session key and recorded in decryption enveloped as data_block. A copy of session key is encrypted and recorded in key_block.
Below is the example to overwrite data_keyname and data_method to create decryption envelope from the encryption envelope.

Figure 3
Figure 4

Below is the example to overwrite key_keyname and key_method to create key_block for encryption of session key.

Figure 5

Figure 6

Same thing can be applied in the verilog code to encrypt any logic.


Reference:

(1) IEEE Standard for SystemVerilog— Unified Hardware Design, Specification, and Verification Language,IEEE Std 1800™-2012 
(2) Questa SIM User’s Manual, v10.3a

Saturday, 31 October 2015

SED commands which can be used frequently to reduce coding time

This blog talks about the most usable “sed” commands in a day-to-day life to reduce coding time.
Nowadays, in IT industry many tasks are common and most of us are doing some repetitive jobs which consumes a lot of time. Some tasks are really very boring like “deleting words” or “inserting or replacing some text” in the file.

For one or two file, it is easy to do modification manually but when there is a number of files required same modification then we generally use “sed” and “awk” command which makes our life easier.

Following are the 10 most usable sed commands:


1. For doing search and replace in the file globally:
  • sed –i ‘s/OLD_PATTERN/NEW_PATTERN/g’ filename
          Example: sed –i ‘s/Hi/Hello/g’ myfile
          Data in myfile before sed command:
              Hi
              How are you?
              Are you busy?
              Have you take lunch?
              I am going to mall.

          Data in myfile after sed command:
              Hello
              How are you?
              Are you busy?
              Have you take lunch?
              I am going to mall.

2. Appending any line after specific pattern matched in the file:
  • sed -i "/PATTERN/a\  LINE_TO_BE_ADDED" filename
          Example: sed –i “Hello/a\ I am Munjal” myfile
          Data in myfile after sed command:
              Hello
              I am Munjal
              How are you?
              Are you busy?
              Have you take lunch?
              I am going to mall.

3. Deleting any line which contain specific pattern:
  • sed –i ‘/PATTERN/d’ filename
          Example: sed –i ‘/Munjal/d’ myfile
          Data in myfile after sed command:
              Hello
              How are you?
              Are you busy?
              Have you take lunch?
              I am going to mall.

4. Deleting all lines from starting match to ending match:
  • sed -i '/STARTING_MATCH_PATTERN/,/ENDING_MATCH_PATTERN/d' filename
          Example: sed –i ‘s/How are you/,/Have you take lunch/d’ myfile
          Data in myfile after sed command:
              Hello
              I am going to mall.


5. Case insensitive search and replace:
  • sed -i 's/OLD_PATTERN/NEW_PATTERN/I' filename
          Example: sed –i ‘/hello/Hi/I’ myfile
          Data in myfile after sed command:
              Hi
              I am going to mall.

6. Inserting a blank line above any pattern:
  • sed -i ‘s/PATTERN/\n&/g’ filename
          Example: sed –i ‘/going/\n&/g’ myfile
          Data in myfile after sed command:
              Hi

              I am going to mall.


7. Deleting multiple lines after pattern match with matching line:
  • sed -i '/PATTERN/,+Nd' filename 
          Example: sed –i ‘/How are you/,+2d’ myfile
          Data in myfile before sed command:
              Hello
              How are you?
              Are you busy?
              Have you take lunch?
              I am going to mall.

          Data in myfile after sed command:
              Hello
              I am going to mall.


8. Inserting multiple lines in the file from another file:
  • sed -i '/  PATTERN/r filename_to_add_lines' filename
          Example: sed –i ‘/Are you busy/r yourfile’ myfile
          Data in myfile before sed command:
              Hello
              How are you?
              Are you busy?
              Have you take lunch?
              I am going to mall.

          Data in “yourfile”:
              I am not busy.
              I just wake up.

          Data in myfile after sed command:
              Hello
              How are you?
              Are you busy?
              I am not busy.
              I just wake up.
              Have you take lunch?
              I am going to mall.


9. Converting multiple blank line to single blank line:
  • sed –i ‘/^$/N;/^\n$/D’ filename
          By using above sed command, it replaces multiple consecutive blank lines with single blank line which looks better during reviewing the code.


10. Changing the pattern by grouping words:
  • sed –i ‘s/\(.*\)PATTERN\(.*\)/\2PATTERN\1/g’ filename
          Example: sed –i ‘s/\(.*\) are \(.*\)/\2 are \1/g’ myfile
          Data in myfile after sed command:
              Hello
              you? are How
              Are you busy?
              I am not busy.
              I just wake up.
              Have you take lunch?
              I am going to mall.

11. Adding a new line before pattern match

  • sed -i '/PATTERN/i LINE' filename
12. Adding a new line after pattern match
  • sed -i '/PATTERN/a LINE' filename

Reference:
(1) http://www.grymoire.com/Unix/Sed.html
(2) http://www.computerhope.com/unix/used.htm